 It’s possible to buy preloaded SD cards to use with your Raspberry Pi but at some point you will need to learn to create your own. This will allow to update your system for free or allow you to create multiple SD cards, perhaps one per project.
In this article I will explain how to write the latest official Raspbian image to an SD card using the free Fedora ARM Installer utility. Apart from a few minutes of your time this process is completely free.
[UPDATE Nov 2016 : The Fedora ARM Installer is no longer available on Windows. I would recommend using Etcher instead. You can read how to use Etcher in my Write SD Card Images Using Etcher On Windows, Linux & Mac post.
Step 1 – Obtain the latest Raspbian “Wheezy” image
Head over to RaspberryPi.org and go to their Downloads page. You can either go for the direct or BitTorrent link. I prefer the Torrent as it is usually faster. Either way you will end up with a 500MB ZIP file.
 Step 2 – Extract the image file
Using your favourite compression tool (I prefer 7Zip as it is open source and free) extract the .img file within the ZIP file. Once extracted your img file will be over 1.8GB but smaller than 2GB. This is good as it means it will fit on a 2GB (or larger) SD card.
Step 3 – Download Fedora ARM Installer
To write the image to the SD card we are going to use the Fedora ARM Installer utility. So head over to the Fedora website and download the zip file.
Extract the contents into a folder. There is no need to install this utility as it can be run directly from its own folder once extracted from the zip file.
Step 4 – Run Fedora ARM Installer
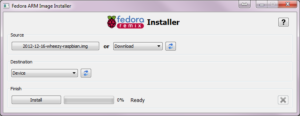
- Right click on the “fedora-arm-installer.exe” file and select “Run as administrator”.

- Click the “Browse” button and select the img file you extracted in Step 2.
- Select the drive letter of your SD card in the “Device” list.
- Double check the drive letter you just selected!
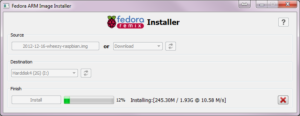
- Click the “Install” button to start the write process.

Wait for the process to complete. Once completed you can close the application using the X in the top right of the application window.
Step 5 – Eject
 Now the image has been written you can eject the SD card, insert it into your Raspberry Pi and power it up.
Note : This process completely overwrites any existing data on your SD card so make sure you are writing to the correct card. To avoid any chance of mistakes I remove all USB storage devices (SD cards, hard drives etc) before writing images.


5 Comments
“…but at some point you will need to learn to create your own”
It’s really irritating when people make assumptions about their audience right off the bat. Such poor style…
Really? I think it is perfectly fair to assume that a regular user of a Raspberry Pi will want to create their own SD cards. Their only other option is to buy a preloaded card. Which is silly if you’ve got an SD card already and two minutes of spare time. If you don’t want to create your own SD cards for the Raspberry Pi I’m not sure the Raspberry Pi is something you are going to enjoy using. As for assumptions, like everyone else in the World, I make plenty of them and will continue to do so.
Yikes. Craig, if you will never need to learn to create your own card, guess what? You are not the intended audience for this article. Move along.
FYI – The Fedora ARM Installer page has been delete:
http://fedoraproject.org/wiki/Fedora_ARM_Installer
Without that it kind of makes this article defunct.
Now, use Fedora Media Writer
https://getfedora.org/en/workstation/download/