This summer I created a pool temperature monitoring and pump control system using a Pi Zero W. This article gives an overview of the system and how I put it together. It allows the temperature of the air and water to be displayed on a web page while automatically turning the pump on and off according to a preset schedule.
The Pool
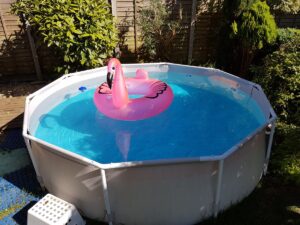
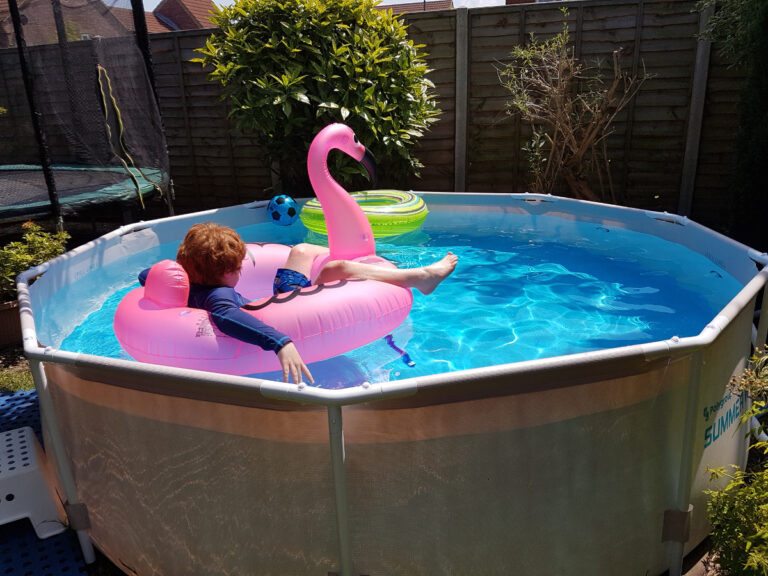
We originally had an 8ft Bestway “fast set” pool with an inflatable ring around the top. This proved to be slightly incompatible with the 3 cats we share the garden with. So this year we changed it for a 10ft metal framed “Summer Escapes” pool. It holds 4100 litres of water and I had no idea what temperature the water ever reached or how this related to the air temperature. I also had no way of easily controlling the pump without fiddling with the settings on a mains timer.
The Requirements
I decided my Pool Temperature Monitoring system should be able to :
- Measure the air and water temperature
- Log temperatures to the internet
- Display temperatures on a web page accessible from a mobile phone
- Allow the pump to be turned on, off or placed in an automatic mode that would follow a schedule
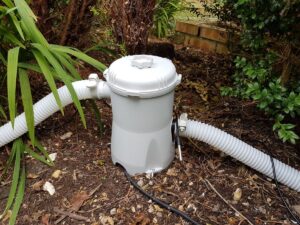 The Water Pump
As with the previous pool it came with a mains powered pump containing a filter. In previous years I controlled this with a traditional mains timer but there were times I wanted to manually turn it on to take advantage of the free electricity available from my solar panels. If the pool had been used in the day I also wanted an easier way to give it an extra few hours without messing with a timer unit.
The Weatherproof Box
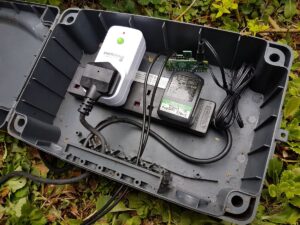 To power the pump I bought a weather proof box that had room for a 4-way extension block. A 10m mains cable runs into the house. There was plenty of room to put in a 5V power supply and a Pi Zero. The sensor cables come in via the rubberised slot.
These boxes seem expensive but when mains is involved you really want something designed to keep out water rather than trying to use an old ice cream tub.
The Parts
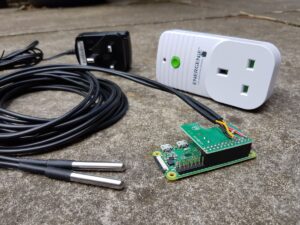 My finished system includes the following :
- Pool [Amazon]
- Pump
- Weatherproof box [Amazon]
- 10m mains extension lead
- Raspberry Pi Zero W [Amazon]
- 5V power supply [Amazon]
- 4GB microSD card
- 2x waterproof DS18B20 temperature sensors with 3m cables [Amazon] [eBay]
- 4.7Kohm resistor for DS18B20s
- Energenie Socket [Amazon] [eBay]
- Energenie Pi-mote add-on [Amazon] [eBay]
Energenie Sockets & Pi-mote
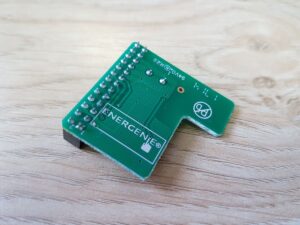 Energenie produce remote control sockets. They operate like most of the remote control sockets out there but with one crucial difference. You can buy a “Pi-mote” add-on for the Pi that lets you control sockets using Python.
It’s really easy to setup and was the perfect combination of hardware to allow me to control the pump. The Pi-mote simply plugs onto the GPIO header and allows sockets to be controlled using single lines of Python.
Temperature Sensors
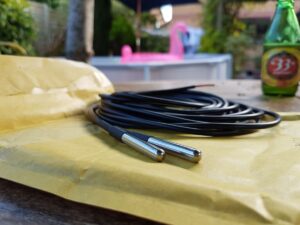 I opted for two DS18B20 “1-wire” interface temperature sensors as I had used them before. Multiple sensors can be connected to the same GPIO pins. The DS18B20 can be purchased as a waterproof version with all the cabling attached. They are slightly more expensive than the standard sensors but all I had to do was solder the three wires to the appropriate GPIO pins on the back of the PiMote and they were ready to go.
One was strategically placed in a hedge to measure air temperature and the other dropped into the pool to measure the water temperature. My sensors had 3m of cable.
The Software
All the software is available on my Pool Monitoring BitBucket Repository. There are two main scripts involved in this system and both are written in Python. They are launched at boot time using cron via the launcher.sh script.
The first (poolmain.py) runs in a continuous loop and checks the mode. If in “auto” it keeps an eye on the time and decides when to turn the pump on and off. It also sends regular temperature readings to the “Thingspeak” cloud-based IoT platform. You can see my public channel with recent air and water temperature readings here : https://thingspeak.com/channels/293211
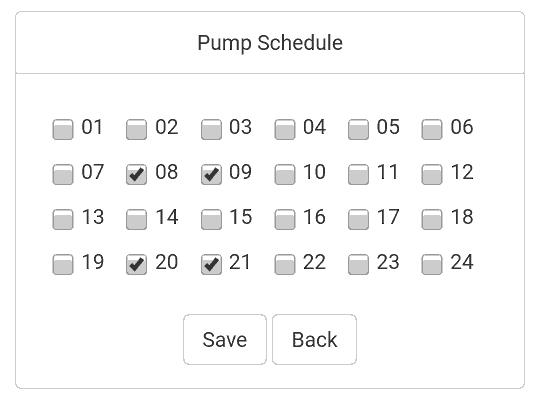
The second (poolweb.py) uses the Flask framework to create a basic set of webpages. This includes a dashboard, a schedule and a login page. The dashboard shows the air and water temperatures and also allows the pump mode to be changed. There are three modes. On, Off and Auto. When in auto the pump is automatically turned on and off depending on the Schedule defined on the schedule page. The login page ensures only authorised people can mess with the pump!
The Web Interface
The system presents a web-page either over the local network or the internet (if you’ve configured your router appropriately). It looks something like this :
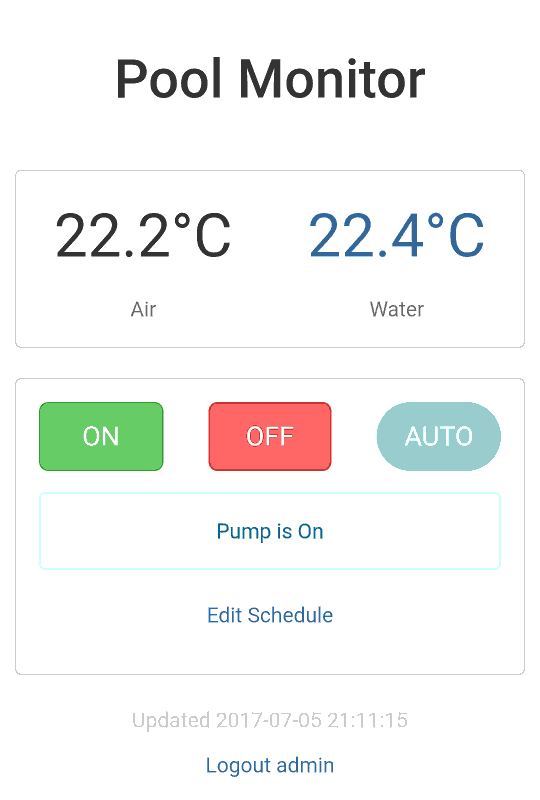
The schedule can be modified on the schedule screen. Ticks are placed against the hours the pump should be active when in “auto” mode :
The default username and password is “admin” and “splishsplosh”. The pages can be accessed via 192.168.1.42:5000 where “192.168.1.42” should be replaced with the IP address of your Pi on your network. 5000 is the default port used by Flask.
Pushover and Thingspeak
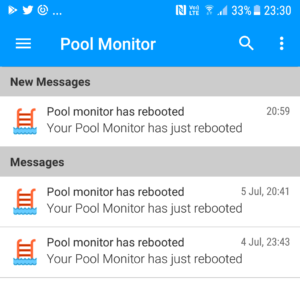 When the system boots it sends a notification using Pushover. This can then be read on a mobile phone using their app. It’s a great service and you can use it to manage notifications from other systems.
The notification message contains the internet IP address of your network and if you have set up port forwarding to the Pi you can access the dashboard when away from home. It assumes you are forwarding port 50000 to port 5000 on the Pi.
Temperatures are sent to Thingspeak which allows you to see your data plotted as a graph.
Both these services require you to create an account and obtain some API keys. They can be added to the config.py file.
Hardware Setup
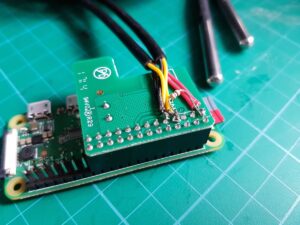 The hardware setup is fairly straightforward.
- The pump is connected to the power strip using an Energenie remote socket.
- The Pi Zero is powered with a 5v phone charger.
- The PiMote is attached to the Pi’s GPIO header.
- The temp sensor wires were soldered onto the back of the PiMote. “Red” to Pin 1 (3.3V), Black to Pin 9 (Gnd) and Yellow to Pin 7 (GPIO4). A 4.7Kohm resistor is put between Pin 1 and Pin 7 as per the 1-wire interface requirements.
- SD card in the Pi’s SD card slot (obviously!)
SD Card Setup
To get the software working you can follow this process. Start by creating a fresh SD card using the latest version of Raspbian. I used the “Lite” version as I didn’t need the desktop environment.
Enable SSH using your preferred method. I used my Windows PC and simply created a blank file named “ssh” on the boot partition of the card before inserting it into the Pi.
I then manually setup the WiFi using a wpa_supplicant.conf file. This should be done before you boot the fresh image for the first time.
Please change the default Pi password to something sensible using this guide. This is particularly important if you are allowing your Pi to be accessed over the internet.
Updates and Package Installation
Run the following commands to update the image :
sudo apt-get update
sudo apt-get -y upgrade
Then install the following packages :
sudo apt-get -y install git
sudo apt-get install python3-gpiozero
sudo apt-get -y install python3-pip
sudo pip3 install flask
sudo pip3 install requests
These packages support the features used in the Pool Monitoring Python scripts.
Pool Monitoring File Downloads
The next step is to clone the software from my BitBucket repository :
git clone https://MattHawkinsUK@bitbucket.org/MattHawkinsUK/rpispy-pool-monitor.git
Now rename the directory to something a bit easier to type :
mv rpispy-pool-monitor pool
and navigate into it :
cd pool
Make the launcher.sh file executable using :
chmod +x launcher.sh
Energenie Socket and Pi-Mote Pairing
The first time the Pi-Mote is used it must be paired with the socket.The process is described in the official user manual. The socket must be put into “learning mode” and this can be done by:
- If socket is on press the green button to turn it off
- Hold the green button for 5 seconds or more and then release it when the lamp starts to flash at 1 second intervals.
Then run the pairing script in the utils directory :
cd /home/pi/pool/utils
python3 energenie_pair.py
Pressing Enter when prompted will pair the Pi-mote to the socket and the socket will have an ID of 1. This ID is used in the Python scripts to turn this specific socket on and off.
DS18B20 Sensor Setup
In order to configure the DS18B20 sensors you need to make a small change to the config.txt file using :
sudo nano /boot/config.txt
add the following line to the bottom :
dtoverlay=w1-gpio,gpiopin=4
There is more detail on the DS18B20 on the DS18B20 1- Wire Digital Thermometer Sensor page.
Web Interface Password
The default username and password is “admin” and “splishsplosh”. The password is stored as a hash so to change it you must use the hashgenerator.py script to convert your new password into a new hash value.
cd /home/pi/pool/utils
nano hashgenerator.py
Then change the default password “splishsplosh” to your password. Save using CTRL-X, Y and Enter. Run the script to create the hash value :
python3 hashgenerator.py
The new hash can be inserted into the config.py file.
Config File
Edit config.py using :
cd /home/pi/pool
nano config.py
Paste in the new hash.
The “FLASHSECRET” can be changed to anything you like. Stick in some random characters to personalise yours.
To send a boot notification to Pushover and temp data to Thingspeak you will need to register with those services and obtain API keys. These are personal to you and should be carefully inserted into the config.py file.
Save and exit the nano editor using CTRL-X, Y, ENTER.
Cron Setup
To get the scripts running when the Pi boots we need to create a cron entry. Do this using :
sudo crontab -e
If prompted select a default text editor. I usually choose nano which is option “2”.
Then add this line at the bottom :
@reboot sh /home/pi/pool/launcher.sh > /home/pi/pool/logs/cronlog 2>&1
Make sure there is a blank line after this line.
This will run the launcher script at boot time and will in turn run the two main Python scripts.
Timezone Setup
One final step is to set the correct timezone for your location. I has to do this to ensure my system knew the correct time and wasn’t out by an hour. You can do this by :
- Running “sudo raspi-config”
- Selecting “Localisation Options”
- Selecting “Change Timezone”
- Select your region
- Select your nearest city/region
- Save and exit by selecting “Finish”
Typing the command :
timedatectl
should report the correct “Local time”.
Ready to go!
Assuming the sensors are connected and you’ve configured everything correctly it should all work when the Pi is rebooted.
Troubleshooting
As with most projects that involve a mixture of hardware and software things might not work straightaway. Here are some tips :
- Check the contents of the logs in /home/pi/pool/logs
- Ensure the temp sensors are wired correctly to 3.3V, GPIO4 and Ground
- Ensure the temp sensors are wired correctly and that there are two “28-00” directories in /sys/bus/w1/devices
- Check all the files are located in /home/pi/pool/
- Check “crontab -e” contains the @reboot line
- Check the launcher.sh script is executable. Use the “ls” command and it should show up in green.
References
The following links provide additional technical information on the technologies I used in this Pool Monitoring and Pump control project :
Energenie Pi-Mote Manual
https://energenie4u.co.uk/res/pdfs/ENER314%20UM.pdf
Energenie Support in gpiozero Library
http://gpiozero.readthedocs.io/en/v1.2.0/api_boards.html#energenie
Flask Documenation
http://flask.pocoo.org/docs/

15 Comments
This is an awesome setup. I just started working on doing pretty much the same thing except my is for HVAC. (2 temps though, supply and return) I am a complete noob at this though. I have my Pi set up with the same sensors as yours. Only 1 connected right now. Im able to run the code and have it show my temp, but cant figure out how to get it up to Thingspeak. I have an account, channel set up, API key and all. My current code is…
import os
import glob
import time
os.system(‘modprobe w1-gpio’)
os.system(‘modprobe w1-therm’)
base_dir = ‘/sys/bus/w1/devices/’
device_folder = glob.glob(base_dir + ’28*’)[0]
device_file = device_folder + ‘/w1_slave’
def read_temp_raw():
f = open(device_file, ‘r’)
lines = f.readlines()
f.close()
return lines
def read_temp():
lines = read_temp_raw()
while lines[0].strip()[-3:] != ‘YES’:
time.sleep(0.2)
lines = read_temp_raw()
equals_pos = lines[1].find(‘t=’)
if equals_pos != -1:
temp_string = lines[1][equals_pos+2:]
temp_c = float(temp_string) / 1000.0
temp_f = temp_c * 9.0 / 5.0 + 32.0
return temp_f, temp_c
while True:

print(read_temp())

time.sleep(1)
Tried reading your code to get just the part to send to Thingspeak but as I said, Im a noob and not 100% sure which part I need. I think its this one…
# Read temperatures and send to Thingspeak
# every 5 loops
loopCounter+=1
if loopCounter==loopSendData:
temp1,temp2=p.readTemps(mySensorIDs)
p.sendThingspeak(c.THINGSPEAKURL,c.THINGSPEAKKEY,’field1′,’field2′,temp1,temp2)
loopCounter=0
Where you have “mySensorIDs” would be my 28-XXXXXXXXX Id’s for my sensors?
ThinkspeakURL and KEY are my url and key, Field Identifiers and names to what mine are…
Does the temp1,temp2 before sensorIDS need to be changed to anything?, does the loopcounter you have make a difference on mine?
Thanks for any help you can give.
Dan
Hi Dan,
“p.sendThingspeak” is the function called “sendThingspeak” that is imported from “poollib.py”. So you could copy the function definition into your code and refer to it as “sendThingspeak” rather than “p.sendThingspeak”.
c.THINGSPEAKURL,c.THINGSPEAKKEY are variables that are imported from the “config.py” file. You could either import your own config.py file or replace these with THINGSPEAKURL and THINGSPEAKKEY.
i.e. stick these near the start of your script :
THINGSPEAKKEY='yourkeygoeshere'THINGSPEAKURL='https://api.thingspeak.com/update'
This bit:
while True:print(read_temp())
time.sleep(1)
could become:
while True:tempc,tempf=readTemp()
sendThingspeak(THINGSPEAKURL,THINGSPEAKKEY,'field1','field2',tempf,tempc)
print(tempf)
print(tempc)
time.sleep(1)
If you are still struggling create a new script. Set tempf and tempc to dummy values and get the Thingspeak bit to work without worrying about the sensor stuff. Get the sensor stuff working in a separate script.
With both mechanisms working it’s then to combine and use the sensors to feed the values into the Thingspeak section.
Regards,
Matt
Hi. I am looking to just measure temperature in my pool – can I connect the probe directly to the Pi? If so, how would I do this?
Thanks!
The DS18B20 can be connected directly. I only attached to the PiMote board as it made it easier to get to the Pi’s GPIO pins. See my DS18B20 tutorial.
Thanks Matt. I managed to get it all to work – but I am having an issue.
From time to time the sensor no longer appears in the /sys/bus/w1/devices/ directory. Its like, one minute its there, then the directory is not there.
Do you have any advice?
Thanks
Chris
This could be due to a wiring issue between the sensor and Pi GPIO. Double check the connections are good. Could also be due to the length of cable. Mine are 3m and seem to work OK.
Cron log reports the following:
traceback (most recent call last):
File “/home/pi/pool/poolmain.py”, line 27, in
import poollib as p
File “/home/pi/pool/poollib.py”, line 29, in
import requests
ImportError: No module named ‘requests’
Traceback (most recent call last):
File “/home/pi/pool/poolweb.py”, line 29, in
import poollib as p
File “/home/pi/pool/poollib.py”, line 29, in
import requests
ImportError: No module named ‘requests’
This is probably due to “requests” not being installed. Use “sudo pip3 install requests” to install it.
Hi Matt,
This is an excellent write-up. I have been able to get the entire system working fine but my question is, how can I convert the temperature to show Fahrenheit instead of Celsius on the website that Flask is running?
Thanks
Dan
I’ve just updated the poollib,poolmain,poolweb files, index and debug templates and the config.py file. If you look at the config,py file there is new variable TEMPUNIT. Add this to your current file and set to ‘F’. Then overwrite the 5 other files. This will convert the values to Fahrenheit and dispay F rather than C in the web interface.
Thanks Matt,
That worked like a charm and it is displaying in Fahrenheit now. Thanks for quick reply also.
Hi
if i should give a suggestion then it would be to add support for solar heating, would require one more pump and 1 more temp sensor that can say when the water inside the solar heating loop is starting to get warmer as the sun heats it up, this would trigger the 2nd pump, the pump can be turned off when the water in the solar heating circuit is the same as the pool
Hi Matt, thanks very much for creating this – it’s really good.
I’ve had this running successfully most of the summer in my garden and it’s allowed me to check on the status of my pool and switch on/off remotely and schedule the heating when I’ve got a cheaper electricity rate.
It’s my first Raspberry Pi project and I’m really enjoying it – next summer I’m hoping to modify your code to behave as a thermostat and keep target pool temp (we’ve found 31 degrees is quite nice!!), and then run the pump/heater for longer to exceed this whenever my solar panels are generating.
I do have a question though; I noticed you used “sudo” to setup Crontab to load the script on bootup privileges. Isn’t there an additional “cyber security” risk of doing this? I.e. if someone found a way to modify your code remotely, they could do much more harm? I’ve changed my Pi’s username/password but I’m not expert enough to understand the risks of allowing WWW access to a computer like this on my network.
Hi Matt, this is an awesome project. Trying to figure out how to tweak it for myself. My pi resides in a shed by my pool and I would like to monitor the internal CPU temp of the pi. Any ideas on how to add it to the code and possibly a 3rd DS18B20?
I’m trying to learn and would appreciate any direction you can give me.
Thank you
Hi Matt – wonderful project that I have just installed on the Raspberry Pi I am making for a friend. He want to see if the summer here in Costa del sol may be prolonged some weeks if heating the pool a bit.
I have absolutely no python experience – and thought I would ask an expert this simple question:
I want to use an GPIO to controll the pump as this is way easier in this setup.
Have the relay working as well as the rest of the setup with in & out temperature (thanks to you).
I am sure all I have to do, is to replace the “Energenie” object with another object – maybe you could save me some time by suggesting a direction of search?
Might come in handy for others as the wireless power control module is not that easy to buy everywhere 😉
TIA
/Niels