Booting a Pi 400 from an SSD is an easy upgrade from the standard SD card. It can give your Pi additional storage capacity, improved reliability as well as massively increased read/write performance. With the price of SSDs dropping to pocket-money prices you can perform this upgrade for less than $40 (£30).
I have been running my Pi 400 from a SanDisk Ultra 128GB Class 10 A1 microSD card. That had been working fine but I decided to give an SSD a try to see how easy it would be. The short answer is that is really easy and only took me 5-10 minutes to swap from the SD card to the new SSD. It resulted in an approximate x10 increase in drive performance.
SSD Hardware
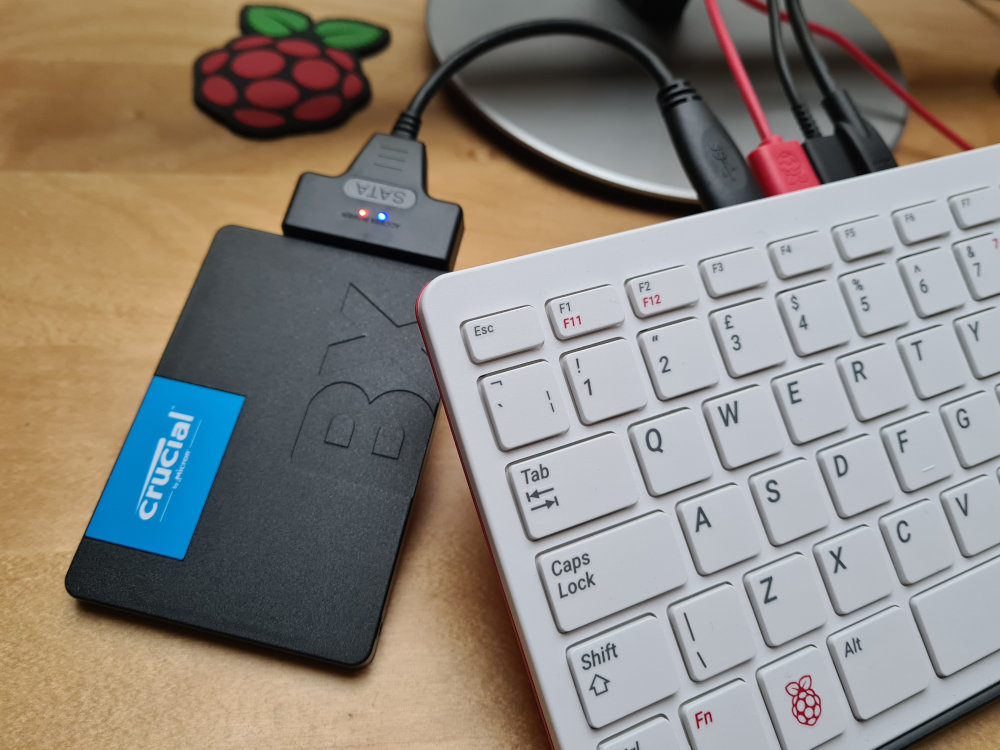
The Pi 3 and Pi 4 can boot from USB devices and this includes an SSD plugged in via an adapter cable. For my upgrade I purchased a Crucial BX500 240GB SSD (SATA interface) and a SATA-USB adapter cable. The drive cost $34 (£25) and the cable cost $6 (£4.50) including postage. This worked out as the same price as buying a decent 256GB SD card.
There are a lot of different SDD models out there to choose from but there isn’t much point buying a premium model for general tasks. The BX500 isn’t the best drive out there but is fine for using with the Pi.
Original Setup
To start with my Pi 400 was running fine with the SanDisk card loaded with a recent Raspberry Pi OS image. I updated it using:
sudo apt update
sudo apt upgrade
Then I checked the firmware was up to date and would support booting from an SSD:
sudo rpi-eeprom-updateThis gave me the output:
BCM2711 detected
VL805 firmware in bootloader EEPROM
BOOTLOADER: up-to-date
CURRENT: Thu 3 Sep 12:11:43 UTC 2020 (1599135103)
LATEST: Thu 3 Sep 12:11:43 UTC 2020 (1599135103)
FW DIR: /lib/firmware/raspberrypi/bootloader/critical
VL805: up-to-date
CURRENT: 000138a1
LATEST: 000138a1
The important bits to note are the two “up-to-date” messages and the CURRENT/LATEST numbers both matching.
Benchmark Pi 400 SD Card Performance
To ensure I could easily compare the performance before and after the upgrade I ran the “Raspberry Pi Diagnostics utility”. This is available from the main menu under “Accessories”. Simply click “Run Tests” and wait for it to finish. Then clicking “Show Logs” will give you the technical information.
Here is the log using my SanDisk card:
Raspberry Pi Diagnostics - version 0.6
Tue Dec 22 16:16:51 2020
Test : SD Card Speed Test
Run 1
prepare-file;0;0;29231;57
seq-write;0;0;26099;50
rand-4k-write;0;0;3143;785
rand-4k-read;9647;2411;0;0
Sequential write speed 26099 KB/sec (target 10000) - PASS
Random write speed 785 IOPS (target 500) - PASS
Random read speed 2411 IOPS (target 1500) - PASS
Test PASS
These are good results and are to be expected given the SanDisk’s Class 10 rating. More information about SD card speed ratings is available from the SD Association’s site.
Copy SD Card to SSD
The SSD was plugged into the Pi 400 using one of the USB 3.0 ports (the ones with the blue plastic) using the adapter cable.

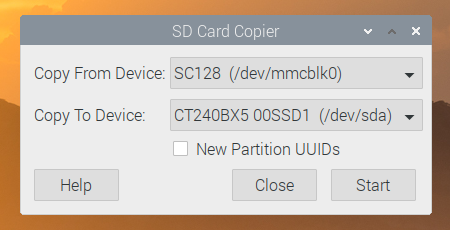
Using the menu I ran the “SD Card Copier” utility under “Accessories”.

Then selected my SD card under “Copy From Device” and my SSD under “Copy To Device”.
In my case “SC128” was the 128GB SanDisk card. The Crucial 240GB SSD was the “CT240BX5 00SSD1”.
WARNING: Make sure you copy the SD Card to the new SSD!
When I was ready I clicked “Start”. The process took a few minutes and when finished it stated the copy had finished.
Using the menu I told the Pi to shutdown. Once shutdown I removed the power cable and removed the SD card.
Boot From SSD
This was the moment of truth. With the SD card removed and the SSD plugged into a USB-3.0 port I inserted the power cable.
The lights on the SATA-USB adapter blinked and the Pi 400 booted to the Raspberry Pi OS desktop.
Success!
Benchmark Pi 400 SSD
With the system now running from the SSD I re-ran the diagnostics utility to get some numbers:
Raspberry Pi Diagnostics - version 0.6
Tue Dec 22 16:21:45 2020
Test : SD Card Speed Test
Run 1
prepare-file;0;0;295207;576
seq-write;0;0;306242;598
rand-4k-write;0;0;63875;15968
rand-4k-read;61305;15326;0;0
Sequential write speed 306242 KB/sec (target 10000) - PASS
Random write speed 15968 IOPS (target 500) - PASS
Random read speed 15326 IOPS (target 1500) - PASS
Test PASS
The sequential write speed had increased from 26MB/s to 306MB/s. The Random write speed increased from 785 to 15968. The Random read speed increased from 2411 to 15326.
There is a lot of debate when it comes to measuring performance of flash memory devices. For my purposes this simple approach is good enough and counts as a massive improvement over the SD card.
Check for UASP Compatibility
USB Attached SCSI Protocol (UASP) is a technology used by SSDs to improve read/write performance and lower CPU utilisation. Most new drives and adapters will support it. To check if my drive was using UASP I ran the following command:
lsusb -tThis gave me the output:

The important bit is “Class=Mass Storage, Driver=uas”. This shows that my drive is using UASP.
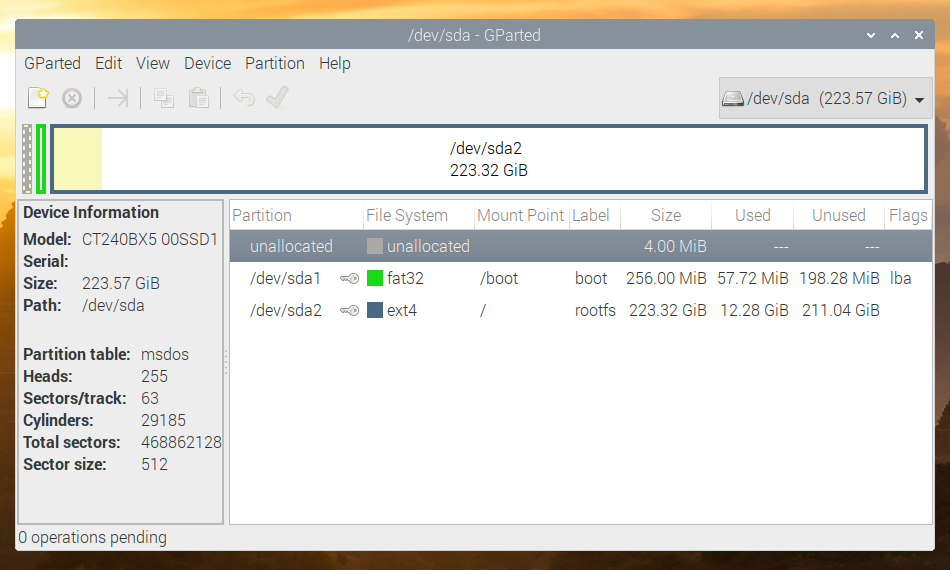
Check Pi 400 SSD Partitions Using GParted
To double-check what partitions I now had on the new SSD I installed GParted:
sudo apt install gpartedOnce installed I ran it from the command line using:
gpartedwhich gave me something like this:

This shows the 250MB FAT32 “boot” partition and an EXT4 ~240GB partition. At this point I realised I didn’t need to resize anything to take advantage of the extra space.
SSD Size 128GB or 256GB?
I really don’t need 100GB+ of space on my Pi 400 so why did I choose a 240GB over a 128GB device? There were two reasons:
- The price difference was only a few pounds so I figured in a few years I would rather be left with a larger drive for possible use in other projects.
- Flash memory devices wear out over time. The larger the device the lower the wear on that device for a given volume of data transfer. So better to have the larger drive even if you don’t need that capacity. For the BX500 the 240GB device has an endurance of 80TB. That’s the equivalent of writing 40GB per day for 5 years. Plenty for me!
Power and Enclosures
My SSD runs fine using an Official USB-C power supply. If your SSD is more power hungry or your power supply isn’t suitable you may need an external power source for the SSD. This is one reason I’m happy with the Crucial BX500 as it is a nice neat solution that doesn’t require an enclosure or additional power.
SSD Upgrade on a Pi 3 or Pi 4
This approach to upgrading from an SD Cad to SSD should work for the Pi 3 and Pi 4. Just make sure you are using a recent Raspberry Pi OS image.
A Note on TRIM Support
TRIM is another mechanism that SSDs can used to improve performance. It is explained in more details on the Crucial site. Enabling it is a long drawn-out process and I’m not going to cover it here. If you do want to enable TRIM on your Pi then checkout Jeff Geerling’s “Enabling TRIM on an external SSD on a Raspberry Pi” article. For my purposes I am going to ignore TRIM and leave my SSD running as it is.
Buy an SDD and Adapter Cable
Here are some links to the items I used:
- Crucial BX500 240GB SSD [Amazon]
- SATA-USB-3 Adapter Cable [Amazon]
- SATA-USB-3 Adapter Cables [eBay]
Some of the product links on this page are affiliate links. I receive a small commission based on purchases made via these links. The price you pay is the same.


13 Comments
Small typo in UASP compatibility check: “ususb -t” should be “lsusb -t” (as can be seen on the screenshot).
Great article! Really simple to follow. I got a RPi 400 for Christmas and will be trying this myself soon. Do you notice any improvements in every day use? Is booting faster or opening programs?
It’s definitely slicker. But more a polished improvement rather than a revolution. However I haven’t done many tasks recently that involve writing much data i.e. photo editing.
Tried your steps with the same hardware, just a larger Crucial SSD, and can’t boot from the SSD. I get a RPi splash screen, or a Ubuntu rotating icon, but never anything further. Tried different solutions at the command prompt, running off a SD, from various blogs, without success. So was wondering if there was anything else you did that made yours work first time. Currently using my SSD successfully as a storage drive.
The only thing I can suggest is to try a different SATA-USB cable. I have three of them and one of them causes the Pi to not boot.
Okay, thanks. I just upgraded to an SSD and the difference is huge!
Booting is obviously faster, but opening Chromium is faster (2 seconds on first launch), and opening Gimp only takes about five seconds. This is probably the best upgrade you can do for performance. I’ve also overclocked to 2.2Ghz too and that’s working fine.
Thanks for this article. Sadly when I followed along using a new 120GB BX500 instead of the 240GB you mention. When booting with just the SSD (no SD card) I have a lot of activity on the SSD (light flashing) but not a lot progressing on screen. Never completes boot. Any thoughts?
This may be caused by the cable you are using. I swapped mine for another I had and found it would not boot. This seemed to be because the older cable was only SATA II and not SATA III compatible. It’s tricky to tell because all the SATA to USB adaptors look the same.
Thanks Matt. I will order a new adapter/cable and let you know.
Great article. I had a spare plextor 512gb ssd and a ugreen sata III usb 3 enclosure. At first I couldn’t get it working and turned out that the one USB 3 port to the far left on the rpi400 is the only one that will boot for me. Also the ugreen enclosure has some sleep mechanism that I think is disrupting the process. I am able to get it working but I ordered the same USB adapter that you got and will report back. Great stuff.
I had this and using Recovery Mode (holding Shift) and installing a new image works… so it’s not the cable but likely the boot sequence is different using usb
Raspberry Pi 400 SSD Upgrade.
Matt,
I am relatively new with the Pi, purchased my Pi 400 in January 2021 and to be honest i have been messing with it daily with a Sandisk 16gb sd card, which is now just about full!!. So i was really interested in increasing my longevity with the 400.
So I now have the Crucial BX500 240GB attached and working, after a little hiccup? I purchased the Sabrent case at the same time which came with a usb lead, initially this combo would not boot! so I took it out the case and just attached the ssd direct with the SATA cable and Success booted straight away, the quickness of everything is outstanding. Sage advice about the cable if the boot doesnt work.
Many thanks for your efforts
Kind Rgds
Steve
I would definitely enable TRIM as it evens out wear on your SSD.