There are lots of techniques for running a script when the Pi boots and which one you choose will depend on exactly what the script does and what you expect. In this post I’ll explain a technique where the Pi automatically logins as the Pi user and immediately executes a Python script.
This has one major advantage over another popular method (see Running A Python Script At Boot Using Cron) in that because the terminal is up and running text output from the script is visible before you are returned to a usable command line prompt.
Auto Login Setup (optional)
The first step is to enable the Pi to login automatically without requiring any user intervention. This step is optional.
At the command prompt or in a terminal window type :
sudo raspi-config
followed by Enter.
Select “Boot Options” then “Desktop/CLI” then “Console Autologin”
Prepare Script
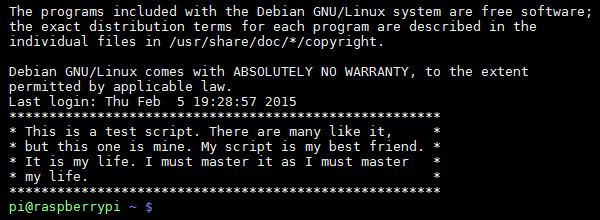
My test script is called “myscript.py” and is located in /home/pi/. This is what it contains :
#!/usr/bin/python
print("******************************************************")
print("* This is a test script. There are many like it,     *")
print("* but this one is mine. My script is my best friend. *")
print("* It is my life. I must master it as I must master   *")
print("* my life.                                           *")
print("******************************************************")
You can download this directly to your Pi by using the following command :
wget https://bitbucket.org/MattHawkinsUK/rpispy-misc/raw/master/python/myscript.py
I strongly suggest getting this working before trying any other scripts!
Auto-run Script Setup
Now we need to tell the operating system to run the script for the Pi user. In the command prompt or in a terminal window type :
sudo nano /etc/profile
Scroll to the bottom and add the following line :
sudo python /home/pi/myscript.py
where “/home/pi/myscript.py” is the path to your script.
Type “Ctrl+X” to exit, then “Y” to save followed by “Enter” twice.
A Script Without End
You will only be returned to the command line when your script is complete. If your script contains an endless loop then you may want to use this line in the profile file instead :
sudo python /home/pi/myscript.py &
This will allow the script to run in the background but you will not see any text output from it.
Reboot and Test
To test if this has worked reboot your Pi using :
sudo reboot
When it starts up your script will run and you will see something like this :

Due to the technique we’ve used the script is run whenever the Pi user logs in. This means if you create other terminal sessions (via SSH for example) the script will run each time.
Troubleshooting
If it doesn’t work here are some things to try :
- Run your script manually and check it works correctly
- Use my example script and check that works
- Double check the initial steps


31 Comments
For running Python scripts I always use supervisors, makes it easy to see what is happening. http://supervisord.org/
Hi, I tried the method you’ve described above, however I use a “while True:” loop in my program. My Pi is stuck a black screen during the boot, Is this because the script never completes? Please help resurrect my pi
Try adding a & at the end of the line ie:
sudo python /home/pi/myscript.py &Hello, followed your blog and it resulted in the same black screen [probably due to while True:].
You suggest to add a &. But how do I enter the edit mode and get things back to normal?
Connect to the Pi via SSH using Putty or similar app and you should be able to get a command line and re-edit the files.
Thank you very much, that result for me 🙂
it boots, run the script and continue normaly.
Same happened to me. There is no display anymore.
How successful this technique is depends on what the Python script does and whether it exits or is an endless loop.
Thanks Matt great tutorial.
To the others that get stuck with the black screen this is how I reverted back to how it was.
When the pi boots up and the script starts running just Ctrl+c which takes you back to the command line, you can # out the added lines in the nano files and delete the # so the file reverts back to how it was.
Thank you so much for this solution. We were trying for 3-4 days to run Python script at boot time but that all went into vain. This solution worked out. many thanx.
Thanks for the guide, my script ran perfectly at startup!
I am having the same problem of the black screen at boot (probably due to my while true loop). I keep trying to control-C on my keyboard but that doesn’t work. My Mac also refuses to connect to the pi via SSH. Anything else I can try? Otherwise I will just reinstall the os, no big deal.
This technique is only suitable for scripts that perform a task and then exit. If they get stuck in a loop they may stop the boot sequence completing.
For those who are facing black screen problem
Just boot up the pie
Allow your script to run at same time press ctrl+alt+f1 and then ctrl+c
You will be prompted with command prompt where you can make changes
Hello,
I am using Raspberry Pi 3 Model B and today i wanted to autorun a Python script once the Pi is booted up, but suddenly, it says:
” -bash: PKG_CONFIG: command not found ”
And it cannot continue.
Looking forward to getting your help as soon as possible.
Thank you,
I’ve not seen that error before. Does your Python script run without error when you run it on its own?
I’ve ruined my Pi 🙁
Ctrl+C doesn’t work.
ctrl+alt+f1 doens’t work.
SSH doesn’t work as I don’t have the IP.
I will need to format my Pi. Proceed with caution!
You can get the IP using an IP scanner or looking in your router settings.
Do this also work on a .js file? I’m using a raspberry PI 2 and seems like after following all of the steps. I end up running nothing after the boot of RPI. Can you help me to work on these. thanks! my file for example is on test1.js and is located at /home/pi
If it is a Javascript file that would have to run in a browser. So this method isn’t suitable. You would need to launch into the GUI, run a browser and get it to auto load an HMTL file with the JS file included within that.
This method has one major flaw. It could potentially run multiple instances of the script. Which could lead to weird problems (such as multiple writes to a file if using such per script). I got bitten by this and couldn’t figure out the root cause until I issued sudo ps aux | grep -i myscript.py.
I’m still looking for a solution that doesn’t run multiple instances of the python script.
Please state in the article that you CANNOT use loops with this function. You have already ruined several people’s pi’s and now, not mine. It’s not even for personal use but for a company. I’ve spent weeks programming and now I’m locked out. Thanks a lot. Why haven’t you, after so many people said it, noted that this will happen if you use loops?
I’ve updated the article to mention scripts that don’t exit. Re-creating an SD card is all part of experimenting with the Pi. Your own programming or any number of other factors could result in data loss at any time. When developing you really need to backup any work at regular intervals.
Thanks This is helpful for me.
Complete novice here. How do you reset back to the normal boot function and undo whatever changes your script made?
For this technique you would just edit the profile file and remove the line you added that runs the script.
it is still going through this process after deleting sudo python /home/pi/myscript.py & …
Is there a foolproof way to delete your script ‘wget https://bitbucket.org/MattHawkinsUK/rpispy-misc/raw/master/python/myscript.py‘
and reset my Pi back to normal?
I see a lot of people above have had this issue – there must be a solution to revert back
Simply edit the profile file using
sudo nano /etc/profileand remove the line you added. The downloaded demo script can be deleted like any other file usingrm myscript.py.Fixed it. When the script was running and locked up with a blank screen, I did the following:
– [Ctrl][Shift][F2]
– pi [enter]
– raspberry [enter] (NB: NO CHARACTERS SHOW ON SCREEN!)
This got me the command prompt where I could re-edit the profile to remove the additional line
– sudo nano /etc/profile
– Edit, remove or hash the python script (I added a ‘&’)
Now back up and running, lesson learnt.
Thank you for this. It was all I needed for my picture frame.
All the other resources telling me I need to run a cronjob did not work out for me.
So whoever is working with the pi3d PictureFrame.py and wants to autostart it on a Raspberry Pi Zero W… use this method!!
Best
Dustin
Working for me, thank you
Exactly what I was after. I have a Pi Zero W running headless and needed a script running at boot to read data from a barcode reader, yet needed to be able to retrieve the output for debug. Thanks