This tutorial explains how to enable SSH on the Raspberry Pi. There are a number of methods you can use. Secure Shell or SSH is a network protocol that allows you to run commands on a remote device. In the case of the Raspberry Pi can you execute commands over your network from another device such as a PC or laptop. This allows you to control the Pi without attaching a keyboard, mouse or even a monitor.
If configured correctly you can use SSH to communicate with your Pi over the internet.
The Raspbian disables SSH by default for security reasons. If you need to use it then it must be enabled.
Method 1 – Temporary Use
To start the SSH server on a Pi you can open a terminal window (i.e. LXTerminal) and type :
sudo service ssh start
followed by Enter. This needs to be done every time the Pi boots.
Method 2 – Enable Permanently from the Command-line
From the command line start by running the following command :
sudo raspi-config
This will launch the raspi-config utility. Select “Interfacing Options”.
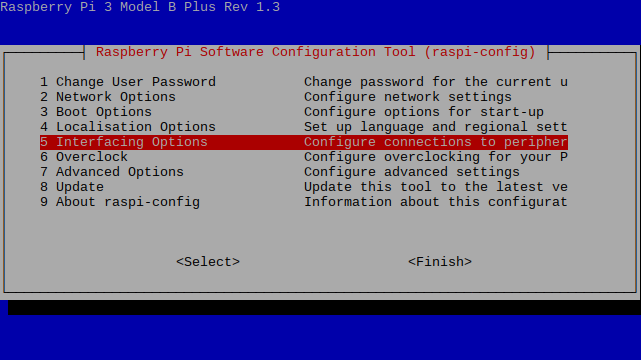
The Advanced options let you enable/disable various interfaces.
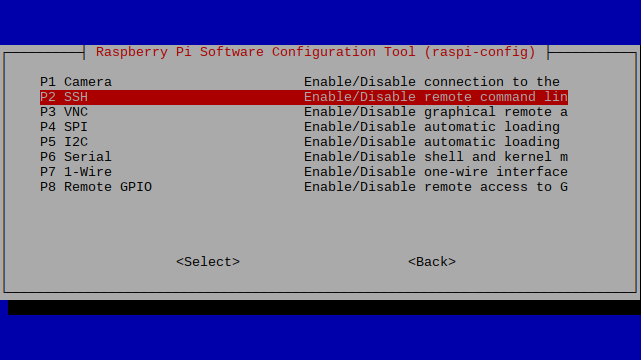
- Select the “SSH” option.
- Set the option to “Yes”
- Select “OK”
- Select “Finish”
If prompted to reboot select “Yes” so that the changes take effect.
Method 3 – Enable Permanently from the Desktop
If your Pi boots to the desktop you can either “Shutdown” and use Method 2 or use the graphical tool “Raspberry Pi Configuration”. This is found under Menu > Preferences > Raspberry Pi Configuration
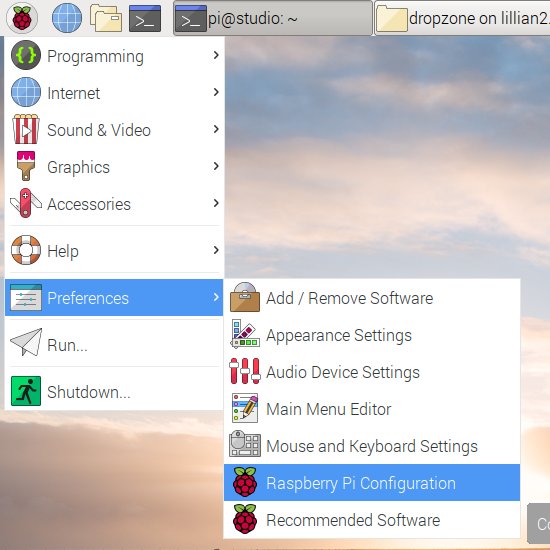
Then you simply need to select the “Interfaces” tab and set SSH to “Enabled” :
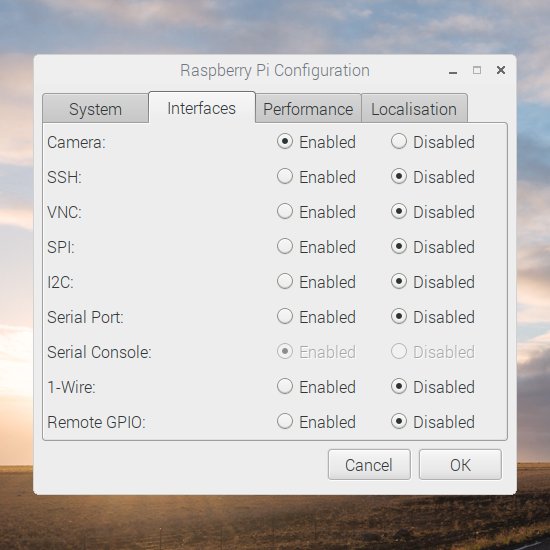
When prompted select “Yes” to reboot so that the changes take effect.
Method 4 – Enable Permanently
The methods above assume you already have access to the Pi and can connect remotely or have a screen attached. This method allows you enable SSH on the SD card directly in another computer.
To enable SSH automatically every time the Pi starts you need to :
- Prepare a fresh SD card with the latest version of Raspbian
- Insert the SD card in your PC
- Create a file on the boot partition named “ssh”
- Eject the SD card, insert into your Pi and power it up
When the Pi boots SSH is enabled by default.
Using SSH on a PC
The free utility “PuTTY” can be used to connect to your Pi using SSH once it is enabled. This will allow you to type commands as if you were using the Pi directly.
MobaXterm is a great application that allows you to connect to multiple devices in a tabbed interface.
WinSCP is another good utility more focused on transferring files. It’s easy to use and similar to using FTP.
Using SSH on an Android Phone
I use the “JuiceSSH” application to connect via SSH on my Android Smartphone.

4 Comments
Thanks for the post. You have a mistake in your post for Method 2. You have ‘Rename “boot_enable_ssh.rc” as “boot.sh”‘. That’s the wrong file extension. It needs to be “boot.rc”.
After following your directions ssh was still not working. I happened to look inside the file boot.sh file and it says in the top comments ‘Name this file as “boot.rc” and put it on the boot partition’.
Please update your post for others. Thanks for the lead.
Happy Pi’ing! 🙂
Well spotted! I’ve updated it now. Thanks for the comment.
If you are using ssh in the open web, you should also take precautions regarding the security of your pi. Here is a short tutorial on how to keep your SSH connection save:
secure your raspberry pi’s ssh connection
another trick
open /etc/rc.local and add before exit 0
/etc/init.d/ssh start