![]() The Raspberry Pi has no on-board storage and requires a suitably prepared SD card in order to function. The SD card contains the operating system which the RPi loads when the power is switched on.
The Raspberry Pi has no on-board storage and requires a suitably prepared SD card in order to function. The SD card contains the operating system which the RPi loads when the power is switched on.
You can either purchase an SD card from the RaspberryPi.org website (when available) or prepare a card yourself. Creating a card yourself is a fairly easy process.
You will obviously need a spare SD card preferably a 2GB or 4GB capacity card. SD cards have a speed rating known as a “class” where a larger number is better. It is recommended to use a card that is Class 4 or Class 6. There have been reports of issues with Class 10 cards so its best to avoid these high speed cards.
Here is the process for creating you own SD card using Windows :
- Download the Fedora ARM Installer from Fedoraproject.org.
- Run the “fedora-arm-installer.exe” program. (You may need to right click and select “Run as Administrator”)

- Insert an SD card into your reader.
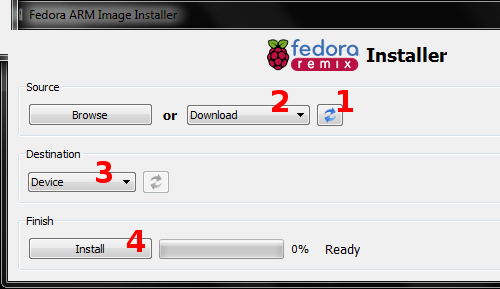
- Click the “refresh” button in the “Source” section and wait for it to update the drop down list.
- Select the “Raspberry Pi Fedora Remix” item in the list (or browse to a local image file if you have downloaded it separately from the Official Download page).
- Select the correct SD card device from the destination drop down.
- Click install.
- Wait for “100%” and “Install Complete!” to be displayed.
Now the writing process has completed close the Installer program using the close “X” in the top right hand corner of the installer window. Eject the SD card. Assuming you’ve got your initial hardware setup you can insert the SD card into the slot on the Raspberry Pi and power it up.
It should now boot up!
