The Raspberry Pi has an SPI (Serial Peripheral Interface) bus which can be enabled on Pins 19,21,23,24 & 26. It is a synchronous serial data link standard and is used for short distance single master communication between devices. As far as the Pi is concerned this is usually relevant to certain sensors and add-on boards.
Step 1 – Enable SPI Interface
The default Raspbian image disables SPI by default so before you can use it the interface must be enabled. This can be done using either of three methods. I’ll describe all methods but the first one is probably easier and quicker.
Method 1 – Using “Raspi-config” on Command Line
From the command line or Terminal window start by running the following command :
sudo raspi-config
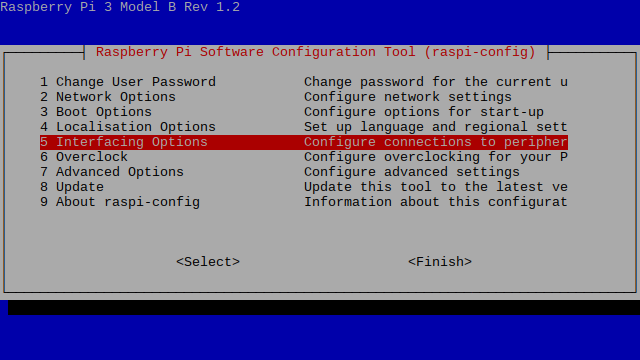
This will launch the raspi-config utility. Select “Interfacing Options” :
Highlight the “SPI” option and activate “<Select>”.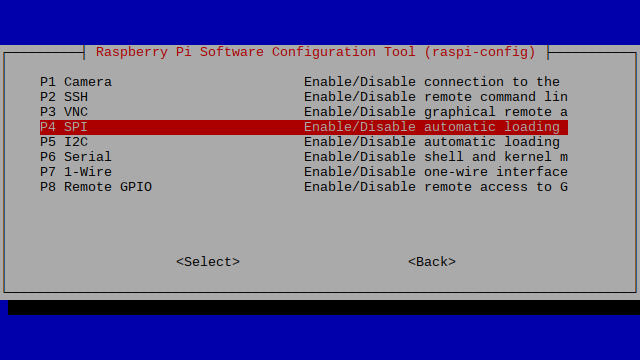
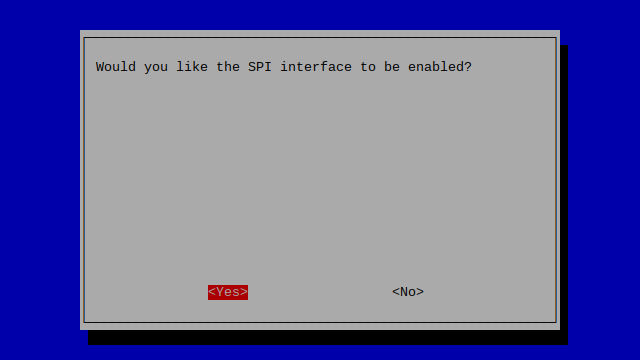
Select and activate “<Yes>” :
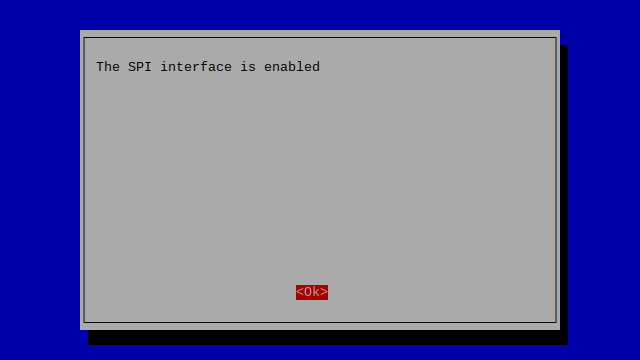
Highlight and activate “<Ok>” :
 When prompted to reboot highlight and activate “<Yes>” :

The Raspberry Pi will reboot and the interface will be enabled.
Method 2 – Using “Raspberry Pi Configuration”
If your Pi boots to the desktop you can either open a Terminal window and use Method 2 or use the graphical tool “Raspberry Pi Configuration”. This is found under Menu > Preferences > Raspberry Pi Configuration

Then you simply need to select the “Interfaces” tab and set SPI to “Enabled” :
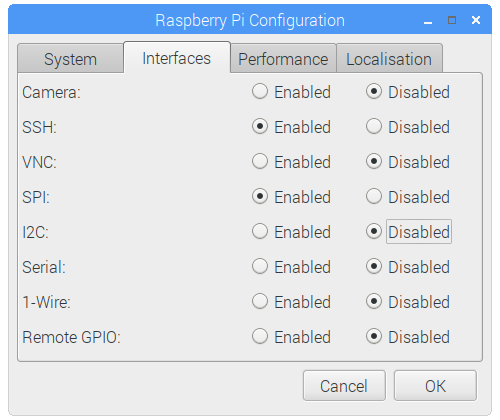
Click the “OK” button. If prompted to reboot select “Yes” so that the changes will take effect.

The Raspberry Pi will reboot and the SPI interface will be enabled.
Method 3 – Enabling By Editing A File Manually
This process assumes you are using the latest Raspbian build from the official downloads page. You can update your current image using :
sudo apt-get update
sudo apt-get upgrade
To enable hardware SPI on the Pi we need to make a modification to a system file :
sudo nano /boot/config.txt
Add the following line at the bottom :
dtparam=spi=on
Use CTRL-X, then Y, then RETURN to save the file and exit. Reboot using the following :
sudo reboot
Step 2 – Checking If SPI Is Enabled (Optional)
To check if the SPI module is loaded by the system run the following command :
lsmod
You should see “spi_bcm2708″ or “spi_bcm2835” listed in the output. You can use the following command to filter the list and make it easier to spot the spi entry :
lsmod | grep spi_
SPI is now enabled.
Step 3 – Install Python SPI Wrapper
In order to read data from the SPI bus in Python we need some additional libraries. These may already be installed but you can check using :
sudo apt-get install -y python-dev python3-dev
and :
sudo apt-get install -y python-spidev python3-spidev
Then to finish we can download ‘py-spidev’ and compile it ready for use :
cd ~
git clone https://github.com/Gadgetoid/py-spidev.git
cd py-spidev
sudo python setup.py install
sudo python3 setup.py install
cd ~
You should now be ready to either communicate with add-on boards using their own libraries (e.g. the PiFace) or other SPI devices (e.g. the MCP3008 ADC).
A full list of tutorials featuring this interface can be found by clicking here.
Finally, there is more technical information about SPI on the Wikipedia page if you are interested.

11 Comments
Hi ; had my spi working before , recently updated my firmware and I now get error: spi_bcm2708 not found . I have followed your steps to getting spidev. It still isn’t listed on lsmod. There is spi_bcm2835 and i2c_bcm2708 . Any suggestions on my next step ?
I’m having the same problem on all my raspis.
I can’t make it work.
Activation via raspi-config fails because it can’t load the driver.
gpio load spi fails with the same message.
Did something change in raspian?
I tested this with the 2015-09-24 version of Raspbian when I setup my Temperature Logger MkII. It is always worth downloading the latest image and writing a fresh SD card.
It worked for me only with the last method. Thanks a lot. I spend a whole day trying to figure out how to solve this error. Thank you
When i run apt-mark showauto | grep spi ig get nothing
From the Python SPI Wrapper section:
“sudo apt-get install python3-spidev python-spidev”
When I tried running that on my pi (immediately after running apt-get update and apt-get upgrade), I got an error:
The following packages have unmet dependencies:
python3-spidev : Depends: python3 (>= 3.4~) but 3.2.3-6 is to be installed
E: Unable to correct problems, you have held broken packages
What does this mean? Best I can tell, it seems to be dependent on a version of python3 that’s newer than what’s on that repository. Is this something I screwed up? Does the package have an incorrect dependency on the repository? How do I fix this?
The default Python 3 on Raspbian at this time is 3.5.3. I would re-write the SD card with a fresh copy of Raspbian as it will be quicker than trying to work out why you’ve got 3.2.3.
I certainly may be clueless, but the detailed instructions are great, but for me I think they are missing one item:
– first time through this tutorial, when I did the “sudo python setup.py install”, I get a C error:
line 20:20 missing #include
– I happen to have the Donald Norris book (where he copied your excellent tutorial and gave you attribution). He had an extra install line “sudo apt-get install python-dev”
– did I miss that on this web page? anyway, after that installation of python-dev, the “sudo python setup.py install” worked perfectly, no errors.
Thanks/cheers
python-dev and python3-dev should already be installed in the latest Raspbian image. I would always recommend starting with a fresh install of Raspbian.
How to use SPI, I2C, USART pins as normal GPIO pins, my project needs more GPIO pins.
Those pins are already GPIO pins. Just disable SPI,I2C and UART in raspi-config and the pins will be normal GPIO pins.